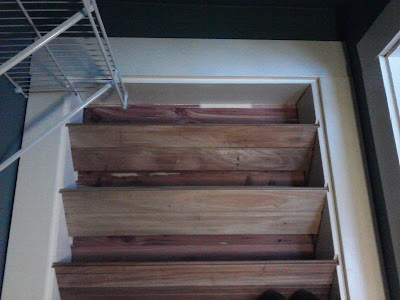

 Instead, Ken had a brainstorm - why not put in a kind of louvered shelf system that could be a recessed shoe rack? Brilliant, says I. And I got to work planning and scrounging wood to build it out.
First, we clad the back wall with cedar planks - they are thin (only about 1/4", so they take up less depth than drywall and they smell pretty too!), inexpensive, and easy to install. Because the studs for the wall of the abutting room were laid flat, we could liquid nails & solid nail the panels right on and not lose much depth. First we ripped out a useless stud that was just a nailer, running down the center of the doorway. If you wanted to, you could simply tear a hole in a wall and leave the studs, and just have 16" wide bays to store shoes.
 This was an easy project (for a change!) - simply think of framing a door. Instead of putting solid 5/4 lumber to case the two tall sides (inside the jamb), we cut 45 degree, 3/4" grooves every 10-12" (wider spacing at the bottom for boots). Cutting the angled grooves was the hardest part of the project. We used the dado blade and it was a bit scary on the old Shopsmith.
 We then trimmed out the doorway just like every other door in the house - 1-bys for the side trim, and a thicker board (we actually used a scrap old piece of window jamb that came with the house) for the header. Painted it and we were ready for Ken's louvers.
We planned to use some scrap flooring that we had in the garage, but after I goofed cutting the first piece, and then realized that we didn't have enough anyway, I took a trip to the handy-dandy ReStore to find 'anything 1 by'. And House Karma was with me - I found scraps of some Brazilian flooring out front - pre-finished even! - and then scrounged around to find more of it until I had 16 pieces that were 31" long, what I needed.
At home, we simply cut them all to length and popped them in - 2 per shelf, with the beads butting together and with a screw as a stop to keep them spaced off the back wall about 1-1/2". They are not attached, so they can be removed for cleaning or any other thing you might want to remove them for.

 And voila - storage for about 30 pair of shoes! We were able to get rid of a horrid back-of-the-door shoe rack and a big box-cubby thing. And I still have more room for shoes - time for a shopping trip!


