Ken's storm windows:
1. Materials Needed:
- Standard 1/2" pipe insulation (cost ~$1 for 6'); 2 pieces the length of the window and 2 pieces the width of the window
- 1"x2" lumber (we found some cull that was very cheap!); 2 pieces the length of the window and 2 pieces the width of the window
- 1"x1" lumber for cross bar (does not need to be 1x1; any scrap 1xsomething will work. You'll need a piece a bit smaller than the window's width)
- Wood glue
- Four 5/8" (no. 6) wood screws
- Heavy duty staple gun or brad nailer & staples or nails (>1/2")
- Heat-shrink window film (twice as large as the window you're covering, for both sides of storm)
- Double-sided tape that comes with window film
- Small strap (scrap of ribbon or thin nylon webbing)
- Trusty hammer & screwdriver
- Scissors
- Hair dryer


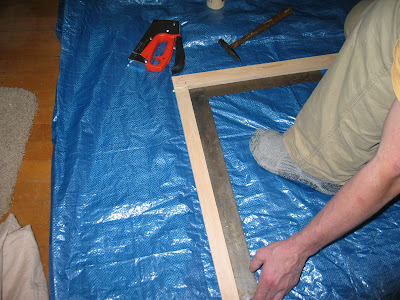
2. Build the frame
- Cut 1"x2" to length (length or width of window opening minus 3/4" for foam. We recommend you test out the measurements on your window/with your foam before cutting all your lumber). We wanted the storms to push in between the stops, so they'd keep out cold air from the sash pockets, so we measured between the stops.
- Make lap joints (cut half way through end of boards the same distance from the end as the width of the board creating a large rabbet). We used a table saw, with the blade set to half the height of a board (3/8"). Clamp on a fence the width of a board, then run the board across the blade several times to remove the material. Repeat with all 4 boards for each window.
- Glue the joints, making sure to cover all sides that touch.
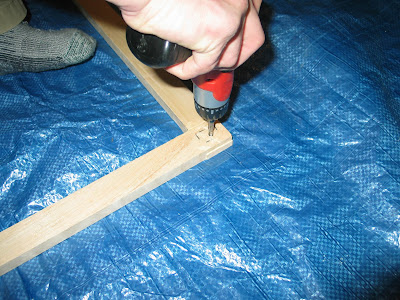
- Hold the joints at right angles, with a square, and staple, or brad nail, the joints.
- Complete the four-sided frame and put one screw in each joint - the staples or nails are just pinning the thing together and it needs a screw to be structurally stable. You could also just use a few screws; we thought the stapling worked great & was quick.
- Note: we did not stain or paint the wood. Very little of the wood shows when installed, they're only in for the winter, and we weren't sure how well the tape would stick to a finished surface.
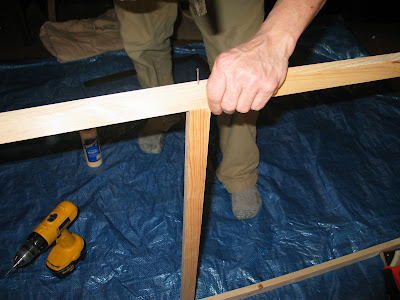
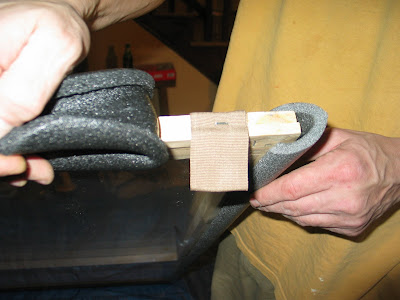
3. Add the cross-bar
- Dry fit the 1"x1" cross bar in the frame at the same height as the sash interface and mark. This cross-bar should be the length of the window's width, minus 2 widths of your 1x2 stock. We found that without the cross-bar, the storm windows bowed in a bit when installed.
- Pilot drill for a single finish nail (6d, 2"), glue the ends of the cross bar and nail together.

4. Tape the perimeter
- Add tape to wood frame, near the middle of the board.
- Press down hard.
- Peel the backer to expose the adhesive.

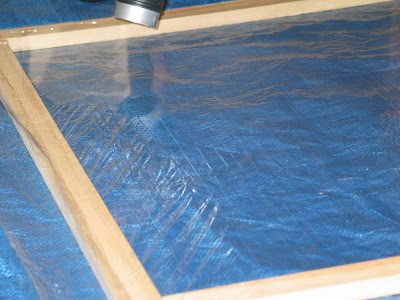
5. Lay plastic
- Find a friend to help.
- Lay plastic over taped side. Do not pull too tight but cover the whole frame so it's fairly taut.
- Press plastic film into adhesive tape with finger.
- Trim off excess plastic. Note: a utility knife sucks for this - for some reason, the plastic is really linear and won't cut right. Instead, run sharp scissors along the edge of the frame. Much better.

6. Shrink plastic
- Heat plastic film with dryer untill all wrinkles are gone.
- Press film into adhesive tape while heating the film.
Flip the frame over; repeat steps 5 and 6 for the other side of the frame, creating a sealed pocket of air.
7. Add pull-tabs
- Staple a scrap of folded ribbon to the back and up over the top - so when pulled the ribbon is attached to the back of the joint. This is so you have a way to get the windows out in the spring! They install tightly.
- We put two tabs on the top of each window. If you're picky (like Sarah), make sure the scrap ribbons coordinate with the paint color of the room.
- At this point, you could label the window with its room and placement so you'll remember next year! We are labeling them along the top, near one of the ribbon tabs.
8. Add foam gasket
- Carefully split open the seam in foam insulation.
- Cut foam to length with 45 degree angle.
- Stretch foam over edge of frame and match corners of foam edges. Trim if necessary.
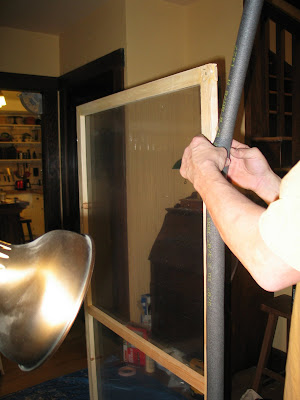
9. Install! (a.k.a., smush into window opening)
- Press into window opening, one side at a time.
- May require some force, keep foam aligned.

We ended up with at least half of our lumber from the cull pile, some scraps we already had in the shop, and most of the plastic purchased new ($11 for a box with 9 big sheets). Ribbons were free from the scrap drawer. Foam was $0.98/piece for a 6 ft section (there were 3' sections in a 4-pack bag that were a bit cheaper for some of the small ends). Overall, we estimate that this project cost about $7 average per window, and we're doing 31 windows (over half are done, rest are started!) The dark foam makes them fade into the window and they're not real noticeable. They seem to work great so far.

10 comments:
Sarah
These are awesome.
These are great and I'm so happy to have some instructions. I'm hoping to one day get enough motivation to build a set of interior wood storms-- a set of hinged screens and removable glass (but now I'm thinking the thermal plastic would be awesome...). We have old and crappy aluminum exteriors that keep our casement windows from being able to swing out. Someday...
I've been planning to put together something similar next weekend, but I only had photo-less descriptions to work with. The visuals help a lot - thanks!
ANOTHER fantastic idea! I am totally going to steal this one from you! It's perfect for the drafty windows in my office.
Very nice job! But I find the pipe insulation a bit unattractive. If you want to see another way to make these that comes out a bit neater see my web site:
http://www.arttec.net/Thermal-Windows
Guy
You've just saved us around £160 GBP, here in Scotland, which we could not afford! My husband was going to install permanent interior frames into our two dormer windows, until I found your blog and instructions simply by chance. We had to use lightweight materials, (so your materials were perfect) as the windows sit within the slant of our roof - as dormer windows do - instead of completely vertical like yours AND there is a long crank handle that comes 2/3 of the way in from the base of the window, leaving about 3 inches to set in the new temporary frame.
You are an angel! Thank you.
Samantha P.S. Cute Bungalow too.
To ensure safety, we need to use the storm protection technology to our windows. We need to choose the best particles for using in our houses.
NYC siding
I believe that interior storm windows are important in every homes.
Plantation shutters are one option that can really improve the looks of your windows. These shutters look great, and usually look so nice you don't even need to add a valance or curtains like you do with blinds or shades. They are usually made of wood, wood composite, or imitation wood. They can be custom made to fit any window, even those with odd shapes and curves that are hard to fit with many window treatment options. There are many different types of finishes and colors, so they can be made to match the décor in your home.Shenandoah Shutters
If you'd like an alternative to casually picking up girls and trying to find out the right thing to say...
If you'd rather have women chase YOU, instead of spending your nights prowling around in noisy bars and night clubs...
Then I urge you to watch this eye-opening video to find out a amazing little secret that has the potential to get you your very own harem of beautiful women just 24 hours from now:
FACEBOOK SEDUCTION SYSTEM!!!
Post a Comment