First, I re-tied the springs - which was quicker and easier than I thought, thanks to some online instructions showing how to do a clove hitch (rusty knot-tying skills, don't tell my former camp counselors). I forgot to take a picture before I covered it with a layer of canvas, so here's the underside:
 And the canvas:
 Next, I had to deal with seat padding. I waited till today to go to the craft store for some cotton batting. We had a heck of a snowstorm yesterday so I was patient till the roads were cleared off. The instructions I had were saying to use cotton batting, though there were a number of opposing views online, so I went with a hybrid approach. I had a bunch of loose polyester fill already, so I plopped that down then covered it with sheets of batting and stapled the top one down to keep everything in place. I thought that might help keep it from getting really lumpy:
Then began the ancient Chinese tack torture. I thought this was going to be really quick (like all the other, staple-on seat covers), but noooo. Even with this extremely helpful tack spacing doo-whacky from Van Dykes, it seriously took about 3 hours to tack down the whole seat cover. And I had to take a lot of breaks. But it's done now:
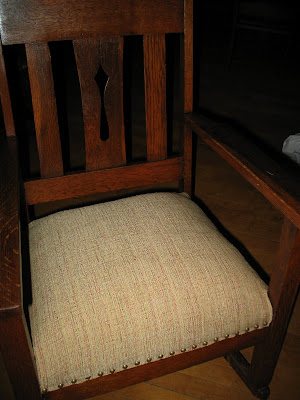 And I finished it with a piece of thin black fabric underneath, like some folks suggested:
 Phew!
Phew!I also finished the small bench in the living room (it just needed tung oil, since I sanded it and filled and reglued its problem areas yesterday):
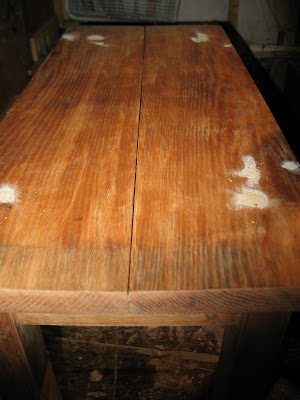 And finished stripping and glued up the end table, which is mahogany, and will just need to oil that baby tomorrow.
Did I already say, phew?

7 comments:
Where are these so-called instructions for reupholstering a chair? I'd like a copy :)
Shane and Casey - I ended up at this post, and followed the 2 links in the top post, plus read some of the discussion. Seemed to work OK, though I'm not sure I've got the finesse down. http://www.oldhouseweb.com/forums/viewtopic.php?f=2&t=18643&p=146789
Ooo.. but it looks good. I thinkyou just convinced me to NOT recover the chair in my office yet, though. There are about 500 of those tacks on it!
Looks great, tho.
You did an awesome job!!
Egad, I haaated hammering in the tacks too! Tying the springs was a close second on my list of hated chair-refinishing steps.
Wait, what was the part I liked again? Does "seeing the finished result" count as a step?
YOU DID EXCELLENT!!!
Post a Comment