Yes, table and bed! This is a totally wacky, totally cool antique we found when researching some furniture.
http://www.flickr.com/photos/nhofer/sets/72157612992430365/
It's on ebay now - in case someone wants to make it their own! Sadly, it's too far away for us to pick up - but an inspiration for amazingly efficient furniture design.
That Murphy sure was clever. Do you think he's the same guy who keeps messing me up with his law?
Friday, January 30, 2009
Three cheers for a new ReStore!
We're getting a ReStore in our neck of the woods! No more grumbling about everyone else's awesome finds! Can't wait till it opens...also, I bet we can bring our paneling from the study there - that would be just as good as a great find!
http://www.wlbz2.com/news/local/story.aspx?storyid=99867&catid=3
http://www.wlbz2.com/news/local/story.aspx?storyid=99867&catid=3
Tuesday, January 27, 2009
Reflections of...


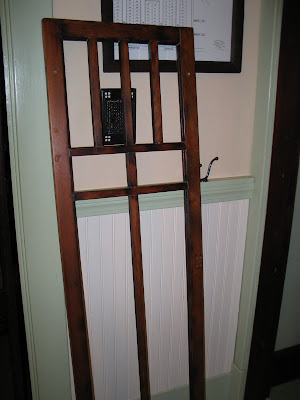
The mudroom mirror-pseudo-hall-tree. Finished last night. No injuries or illnesses! Mittens are officially off the floor. I never realized before, it's tough to take a photo of a mirror. But I dig the cool reflections.
Monday, January 26, 2009
Busting my butt
Literally. I totally took a digger in the driveway on Saturday as I went to start the car so we could go help a friend with an ice dam crisis -- let no good deed go unpunished, right? I think I broke my tailbone - or at least bruised it - but I landed perfectly square right on the old tush so nothing truly bad happened. Although it was the hardest fall I've had (those on skis excluded) in quite a lot of years. Eddy went ballsitic and barked and pushed his way outside to rescue me (I guess I screamed), and Ken came running out in the snow in his socks. Ah, good guys we've got at the Bungalow. It provided loads of comic relief the rest of the weekend, as I made awful noises everytime I bent over or squatted down. And of course, all the wonderful jokes and puns having to do with an ass injury. With PBSs "Make 'em Laugh" episode on physical comedy fresh in our heads, we had just so much material to work with.
Add that to the cold that Ken gave me - and he still has - and we didn't get much of anything done this weekend. But, we did work on one thing: due to an overabundance of mittens and hats strewn about the mudroom, the hall-tree-mirror type project got moved up the list. Last week, I was home in the middle of the day at one point, and managed to squeeze in a trip to the glass shop to get mirror glass cut. The old timer who runs the shop is so cool, we chatted about how the cold bothers our knees and he laughed when I commiserated with his "I'm getting old" comment.
Saturday - post ass-bruising - Ken set up the saw and took a tiny bit off the sides of both of these windows to square them up. We found them on ebay for a couple bucks each, from a California bungalow, and without glass the shipping was really not much.

They've been sitting around the house for a couple of years, moving from room to room, waiting to be turned into mirrors. They're so weather beaten I didn't have to strip them, so a light sanding and some stain/topcoat and they're ready to get some glass installed maybe tonight, if I can stay on my feet. We'll see what happens...
Thursday, January 22, 2009
Back to houseblogging
In the words of Tiny White Bungalow*, "Now, Let's get back to houseblogging." Right. Let's. But we have only been making slow progress on that sitting room. Ken and I attacked the crazy assortment of walls with joint compound and patches over the weekend; still need to finish that up.


* TWB: your blog keeps trying to run scripts & crashes my browser, so sorry I'm not linking to you here, but maybe you want to check that out!
Then it turned out to be a busy week at work, so all I've managed to keep moving forward is stripping paint off the little 2 inch strip of wood inside the door jamb. Talk about feeling like getting nothing done - it took 4 evenings and still needs touch up! Thick paint, limited time, etc. I think we're finally over the hump on that one. We feel like we need to do the correct thing with all the door jambs, since we (sort of) were published in American Bungalow for asking for official guidance about where paint meets natural wood.
Armed with the knowledge of how it should be done, we've felt obligated to do it that way. Stupid high road. Although, it seems kind of weird that it looks to have been originally painted. But maybe the builders didn't read AB! :) Anyways, if it were painted my common sense suggests that you'd be able to see the strip of white from the hall, which is against the advice of the AB editor, so we're doing it this way. What an esoteric thing to worry about - so we'll stop. It wasn't so bad in the guest room, where they bizarrely only painted one of the sides and the other one was stained (hello?), but in this room, it was covered with layers of sticky old paint. Hopefully the door will shut a bit easier now too, so maybe that will make it feel more worth it. Hrmmph.
And the last tiny thing we got done this week was that, on a run to the office store for supplies for a work project, I remembered to bring my tracing of the lantern from the old wallpaper and got it enlarged (they do a 3'x4' enlargement at Staples for $5!). We think we'll paint it on one wall of the room. What do you think? Too "Changing Rooms?" I thought it would be good to commemorate the original wallpaper - and it's a pretty design.

* TWB: your blog keeps trying to run scripts & crashes my browser, so sorry I'm not linking to you here, but maybe you want to check that out!
Tuesday, January 20, 2009
WAHOO!!!
Despite my tendency to be politically-obsessed, we at the Bungalow try to be non-political in our blog posts.
But today is the day for rules to be broken. An unbelievable day for our generation.
We must "pick ourselves up, dust ourselves off, and take up again the work of remaking America."
We at Bangor Bungalow are also humbled, grateful, mindful, and HOPEFUL. And if we can remake an old house with four hands, a few old tools, and spare change, then we can remake a country with sheer force of will. Congratulations and best wishes, President Obama!
Monday, January 19, 2009
Deeper than dog
It snowed. A lot. The neighbor says 18", but I think it's more like a foot. On top of the other foot we got recently. On top of some other miscellaneous snow and ice. So it's now pretty deep. At least it has warmed up by about 50 degrees to about 30 ABOVE zero. It's like summer out there!
Post-shoveling and pre- work conference call, Eddy & I took the camera out for a stroll. He loves, loves, loves the snow - but it's so deep now that we have to shovel him some dog trails out back to do his business. Luckily most people in the neighborhood clear their sidewalks, so we're able to go for long walks without too much trouble.
 Eddy poses by a snowbank at the corner by the park, for scale. Even where not piled up, it's over his head now.
 Two streets over, the sidewalk was pretty photogenic. Love that winter light. The big Y tree on the right has one of those push-in faces on it; I didn't notice while I was taking the photo.
 Next year's X-mas card? Two houses over, the lights were still up in the bush out front and looking oh-so picture-perfect.
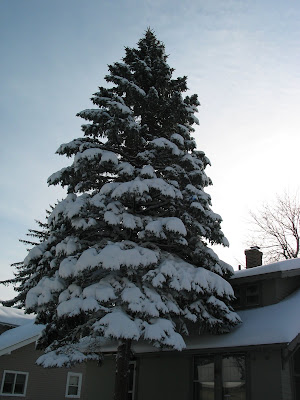
Our big tree out back - poking out of the deck. This guy is a giant.

The cozy bungalow. The snow in the extreme foreground is the snowbank between the sidewalk and road.
Friday, January 16, 2009
Martini-proof hardware installation
Tuesday was just wonderful. First, our package arrived with hardware from Rejuvenation. I think this is the second time we've ever been able to afford something from Rejuvenation (first time was a replacement part they made for a light fixture, kind of a must-have or no light!).
OK, back up a sec. When we did the guest room, Ken stripped all the paint off all the old brass hardware. It took him the better part of a day because there was an awful lot to strip owing to the liberal use of the paintbrush in that there room. When he stripped the paint-caked bin pulls from the built in drawers, they didn't come out so great - turns out they were thinly brass plated. I know, Jason, that probably means they were originally meant to be painted, but I can't paint everything! It hurts to do it after all this paint removing.
Serendipitously, I got an email that day about a sale at Rejuvenation - and was ecstatic to see SOLID BRASS bin pulls at 50% off (read: we can afford that!). Even more ecstatic to find that they had a dozen - enough for the guest room and our bedroom's drawers. And supremely ecstatic that they came with matching, oval head, slotted screws - proper! Note that the old pulls were attached with a dizzying array of varied size and type screws (official term: 'Whatcha got' hardware).
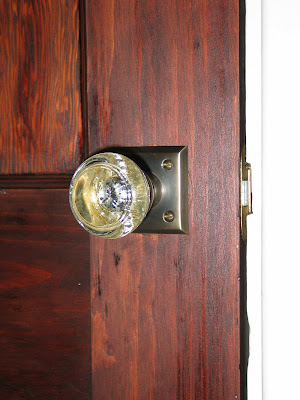
We also paid full price for a pair of doorknob escutcheons for the closet. I looked for a couple of months on ebay, but all the antique ones I liked ended up quite expensive or just not right - we needed a plain, solid brass style without a keyhole. The knobs are lovely old glass - the only glass in the house - but they suit the tiny door. They just had tinny pressed brass escutcheons behind them that were ruining the whole door. So we ponied up the $26 for a pair of these to share shipping with the pulls.
Having opened the package and done much rejoicing, we had to go out for a while - Ken to fix a snowboard with a friend, and me to a historical lecture about Bangor at the library with my very good friend C. We met in the library only to find the lecture had been cancelled. Almost in unison: "Should we just go get a drink, then?" Ah, good friends always know what you're thinking. So we went to the martini bar and I got a signature red martini - blueberry vodka, blood orange juice, and something else. Yum. Good conversation. Then headed back home. To the hardware.
Now, we're not experts on this whole house restoration thing, but at this point, damned if I'm not at least Advanced Intermediate on the hardware installation, due largely to the long and checkered history of screw-ups and having learned from them. So there are four things you need to put in hardware flawlessly, even buzzed on a martini:

OK, back up a sec. When we did the guest room, Ken stripped all the paint off all the old brass hardware. It took him the better part of a day because there was an awful lot to strip owing to the liberal use of the paintbrush in that there room. When he stripped the paint-caked bin pulls from the built in drawers, they didn't come out so great - turns out they were thinly brass plated. I know, Jason, that probably means they were originally meant to be painted, but I can't paint everything! It hurts to do it after all this paint removing.
Serendipitously, I got an email that day about a sale at Rejuvenation - and was ecstatic to see SOLID BRASS bin pulls at 50% off (read: we can afford that!). Even more ecstatic to find that they had a dozen - enough for the guest room and our bedroom's drawers. And supremely ecstatic that they came with matching, oval head, slotted screws - proper! Note that the old pulls were attached with a dizzying array of varied size and type screws (official term: 'Whatcha got' hardware).
We also paid full price for a pair of doorknob escutcheons for the closet. I looked for a couple of months on ebay, but all the antique ones I liked ended up quite expensive or just not right - we needed a plain, solid brass style without a keyhole. The knobs are lovely old glass - the only glass in the house - but they suit the tiny door. They just had tinny pressed brass escutcheons behind them that were ruining the whole door. So we ponied up the $26 for a pair of these to share shipping with the pulls.
Having opened the package and done much rejoicing, we had to go out for a while - Ken to fix a snowboard with a friend, and me to a historical lecture about Bangor at the library with my very good friend C. We met in the library only to find the lecture had been cancelled. Almost in unison: "Should we just go get a drink, then?" Ah, good friends always know what you're thinking. So we went to the martini bar and I got a signature red martini - blueberry vodka, blood orange juice, and something else. Yum. Good conversation. Then headed back home. To the hardware.
Now, we're not experts on this whole house restoration thing, but at this point, damned if I'm not at least Advanced Intermediate on the hardware installation, due largely to the long and checkered history of screw-ups and having learned from them. So there are four things you need to put in hardware flawlessly, even buzzed on a martini:
- Green plastic template thingy. So cheap, so worth it. You all have one, I'm sure. If not, run right out and buy one immediately. I insist.
- Drill. The proper size bit, too. I'm tellin' ya, pilot drill your holes. Ken has finally come around to the Gospel of the Pilot Drilling, and it saves so much aggravation.
- Screw guide-sleeve-collar thingy. The best $3 you'll ever spend. Excluding cappuccinos, of course. Before we bought this, putting in hardware was a horrendous pain - because all the old hardware has slotted screws, the bit slides out, mars the piece, strips the screw head, and basically mangles the whole project. Now we simply don't touch a slotted screw without it.
- Screwdriver to finish by hand. To make sure all the slots are facing the same way.
Armed with the arsenal of hardware installation tools, by myself, I installed 6 pulls and 2 escutcheons in under a half hour. With martini-head. And they're all straight - which is less than I can say for the original installation (using the template revealed that not only did they use Whatcha got hardware, they put the old pulls on at all sorts of kooky angles).

This means that the guest room is officially done except stripping sashes - which is a project for outdoors, when it warms up. It was -30 degrees - yes, that's a minus sign - when we got up today, so a bit cool to be stripping paint outside. :)
Wednesday, January 14, 2009
Hey, Diddle Diddle
I'm procrastinating. Having finished running a zillion statistics at work today, I thought I'd totally be ready to scrub some recently de-papered walls this evening, but laziness has set in.
 Recolored (bright!):


 Don't worry, we kept a small piece of each of these for posterity.
So instead, I'll entertain you with photos of the 6 (or more) layers of wallpaper we just took off the walls in the room formerly known as the Animal Room. Now I'll attempt to start calling it the Sitting Room. We'll see if anything besides Animal Room will ever stick.
So - from the bottom up:
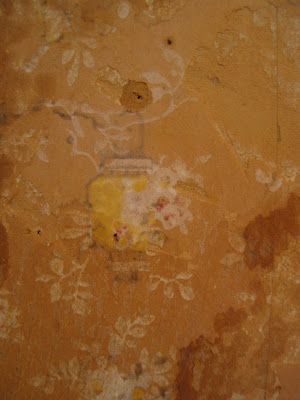
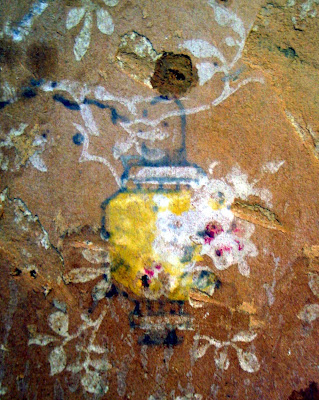
We found this layer of paper barely even readable on the walls - and of course it's the prettiest one. We think it dates to 1940, because someone signed the wall underneath (thanks Hal Hayden, who wrote "Papered March 29, 1940" in pencil)! I'm touching up one of the photos of this pretty "Lantern" paper, possibly to print & frame and keep in the room:
Raw:
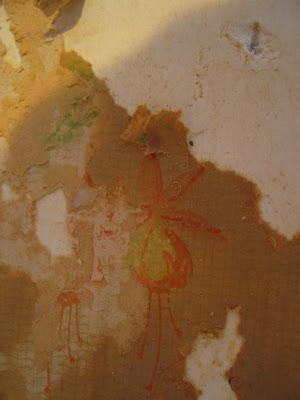
Recolored (bright!): There was a very light, thin, very easily destroyed layer that might have been even lower than the lantern, or it might have just been that one wall had one paper more than the others (some walls in the room are old, old drywall - not plaster - so some reconfiguring happened). It looks like some kind of orchid or ladyslipper. The orange ink ran a lot and I couldn't get more than this much without destroying it:
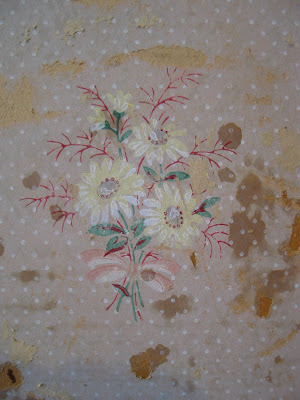
Next was this one, which we called "Polka Dots". It seems to have been coordinated (I guess!) with this border at the top of the walls:
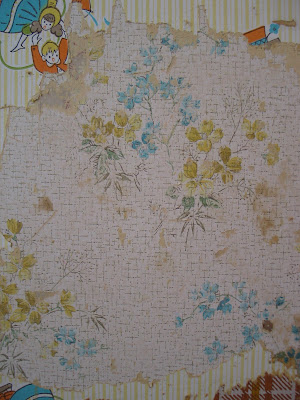
Next was this which we called "Bamboo Flower". Kind of dated looking - like maybe late 1950s?, but not too terrible. Decent muted colors, I guess.
Then we get crazy. As if the plaid & animals combo wasn't enough - guess what was right under that plaid-animal scheme? Nursery rhymes. Yup, scenes from your favorite tales plopped right atop bright-ass yellow stripes. I don't know where the cat & the fiddle is, but Mr. Humpty is there, prompting us to bust out in "The Humpty Dance" several times. The paper was a bit vinyl-ish and my guess is that this is from the late 60s to early 70s. Go disco Humpty! It also was graced by a striped border at the top - probably not a historical shout-out but just dumb luck. In case all the stripes and characters weren't enough for baby to look at, throw some stripes up top to freak him out.
Then - drum roll - the infamous Animals (one wall):
And Plaid (other three walls):
Don't worry, we kept a small piece of each of these for posterity.What do we learn from following the wallpaper trail? 1) The reconfiguration of the room happened a long time ago, maybe even shortly after 1940. 2) People's style sense has steadily declined since 1940, culminating in possibly hallucinogen-inspired melanges of totally wacked subjects (crazed, orange Burberry meets a zookeeper's feverish nightmare? They're watching me, I know the tigers are watching me...)
The neat thing is that almost all of the previous wallpapers featured the yellow-orange-red warm tones, and we'll be doing the same with a warm brown-tan. Apparently it works in there - well, when not smeared across a psychedelic plaid jungle.
OK, now I'm inspired to go scrape the remaining glop off the walls and get them ready for their triumphant return to classiness.
Sunday, January 11, 2009
To do list: almost done
We're in the home stretch on our holiday break, and in addition to sleeping late, skiing, and generally chillin', we are kicking butt on our to-do list.
 Ken finished re-weatherizing the front door, and we did a serious job of stripping all the animal and plaid wallpaper this morning. That's why I ended up with "Eye of the Tiger" stuck in my head all day. That was fun.

Here's the little end table, on the to-do list since the month we bought the house (4 years ago!), all finished - or re-finished, I guess. I just stripped off a layer of goopy old varnish - complete with loads of blue crayon - and then gave it several coats of tung oil. Good as new. Especially since we only paid $12 for it and it's solid mahogany, it looks like.
Ken finished re-weatherizing the front door, and we did a serious job of stripping all the animal and plaid wallpaper this morning. That's why I ended up with "Eye of the Tiger" stuck in my head all day. That was fun.Also, we've been catching up on the Before and After Gallery, to the right. Two down, a couple more rooms to go! Not sure how we got so behind on those. Wait - we've been busy fixing up the house. That's how.
Oh, and here's Henry's to-do list. Napping. Yes, that's a cat wearing a blanket. He's such a hedonist.
Thursday, January 8, 2009
Sooo tacky
Tacks. Many, many tacks. Today was full speed ahead for finishing all those long-ignored furniture projects. I'm pleased to report it went well - but I have to say that I really did not expect putting the seat cover on the rocker to take so incredibly long. Holy crappity, it takes forever to get those damned upholstery tacks in properly - and all perfectly spaced, etc.
First, I re-tied the springs - which was quicker and easier than I thought, thanks to some online instructions showing how to do a clove hitch (rusty knot-tying skills, don't tell my former camp counselors). I forgot to take a picture before I covered it with a layer of canvas, so here's the underside:
 And the canvas:
 Next, I had to deal with seat padding. I waited till today to go to the craft store for some cotton batting. We had a heck of a snowstorm yesterday so I was patient till the roads were cleared off. The instructions I had were saying to use cotton batting, though there were a number of opposing views online, so I went with a hybrid approach. I had a bunch of loose polyester fill already, so I plopped that down then covered it with sheets of batting and stapled the top one down to keep everything in place. I thought that might help keep it from getting really lumpy:

Then began the ancient Chinese tack torture. I thought this was going to be really quick (like all the other, staple-on seat covers), but noooo. Even with this extremely helpful tack spacing doo-whacky from Van Dykes, it seriously took about 3 hours to tack down the whole seat cover. And I had to take a lot of breaks. But it's done now:
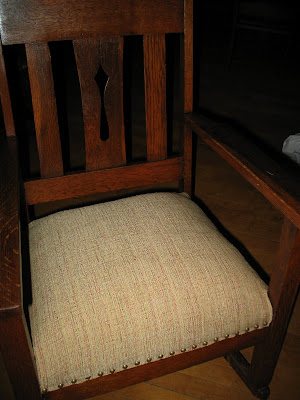 And I finished it with a piece of thin black fabric underneath, like some folks suggested:
 Phew!
Phew!
I also finished the small bench in the living room (it just needed tung oil, since I sanded it and filled and reglued its problem areas yesterday):
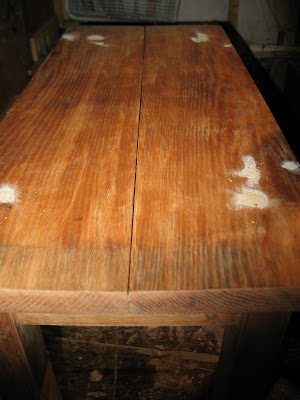 And finished stripping and glued up the end table, which is mahogany, and will just need to oil that baby tomorrow.
Did I already say, phew?
First, I re-tied the springs - which was quicker and easier than I thought, thanks to some online instructions showing how to do a clove hitch (rusty knot-tying skills, don't tell my former camp counselors). I forgot to take a picture before I covered it with a layer of canvas, so here's the underside:
And the canvas: Next, I had to deal with seat padding. I waited till today to go to the craft store for some cotton batting. We had a heck of a snowstorm yesterday so I was patient till the roads were cleared off. The instructions I had were saying to use cotton batting, though there were a number of opposing views online, so I went with a hybrid approach. I had a bunch of loose polyester fill already, so I plopped that down then covered it with sheets of batting and stapled the top one down to keep everything in place. I thought that might help keep it from getting really lumpy:Then began the ancient Chinese tack torture. I thought this was going to be really quick (like all the other, staple-on seat covers), but noooo. Even with this extremely helpful tack spacing doo-whacky from Van Dykes, it seriously took about 3 hours to tack down the whole seat cover. And I had to take a lot of breaks. But it's done now:
And I finished it with a piece of thin black fabric underneath, like some folks suggested: Phew!I also finished the small bench in the living room (it just needed tung oil, since I sanded it and filled and reglued its problem areas yesterday):
And finished stripping and glued up the end table, which is mahogany, and will just need to oil that baby tomorrow.Did I already say, phew?
Monday, January 5, 2009
Adventures in furniture
So, the guest room is done and we're ready to start on the Animal Room...but it's tough to just launch into it, so while Ken is on hiatus this week (his best buddy is in town and we have some skiing and they have other adventures to do), I figured I'll catch up on all that furniture and the accessories I've collected over the past year. Also, we'll need these rockers to furnish the Animal Room when it's done, so we're just thinking ahead. Yeah, that's it. Some things I've already done - this ebay find (but local Maine) footstool was done last week, to go with the chair Ken & I did a month or so ago.
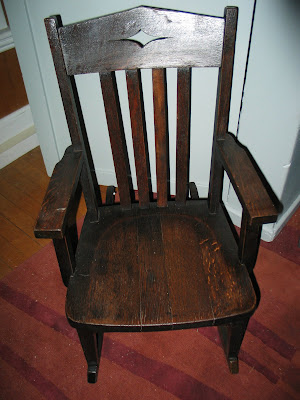
 I also did a mini rocker (kid size) that I snagged at a yard sale for a few bucks up north, and thought it would be cute for a friend's little guy who was visiting. Now I think we'll put it up on ebay since it doesn't get any use here.
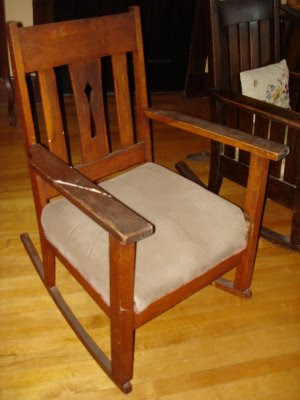
Next up is this big rocker that Ken saw at a yard sale, and he skillfully negotiated them down to $16. It's in great shape, and is a new challenge since I've never re-tied springs or reupholstered a sprung seat before. So...next post will either chronicle a success or a horrible spring incident (ever see the Simpsons where Homer got all the springs to be the mascot for the Springfield Olympics then they didn't use them? And they got stuck in all sorts of horrible places like people's eyes? Shudder.) By the way, it's ridiculous how much extraneous info is catalogued on Wikipedia, no? EVERYTHING is there, down to individual Simpsonses. Hmm. Not sure what I think about that.
Then I have a little bench we're stowing pellets under, and an end table I bought, oh, 3 years ago and still haven't refinished. We'll get there.
Sunday, January 4, 2009
Door hardware
We've been working on all the final stuff in the guest room - window trim, storm windows, and doors. Especially since we have a guest coming this week - we figured he'd like to be able to close the door and have some privacy. So we stripped one side of each door - the POs painted just one side. The two-faced door treatment leads to a two-faced response - both "Yay, they only painted one side!" and "Dammit, why did they paint one side?" Any way you slice it, though, stripping just one side is quicker than both.
Ken heat gunned almost all the paint off, then I cleaned them up and refinished. We installed the main entry door last night. It still needs some tweaking - it ever shut all the way - but it's in. Then we realized that the knob was missing both set screws. Argh, annoying. We took a chilly walk to the hardware store (and coffee store next door) this morning, and even they didn't have the proper set screw. And they usually have all sorts of old fashioned stuff - some of it has been obviously sitting on the shelf since the 1920s! They also have some very cool 1970s vintage stuff - orange sinks, glitzy gold faucets, etc. It's an old, local store.
Luckily, we remembered Crown City Hardware - they make a reproduction of the doorknobs that came with our house* - and they have the exact right set screw (the #10). So we ordered a bunch, assuming we'll find some more missing ones in the future. Thank goodness someone still makes nice things that fit old parts! Damned throw-away society.
The closet door is sitting with its last coat of finish drying this moment - and we'll put it in hopefully tomorrow. Not that the closet interior isn't pretty to look at now...
* We are so, so thankful that nobody got rid of the original doorknobs - there's no way we could possibly afford to replace even a couple of them! They are totally awesome and solid - not like new plasticky ones. Yay for the POs on that.
Subscribe to:
Posts (Atom)
