Tuesday, December 30, 2008

From bamboo to jungle

The room formerly known as the 'bamboo room' has gone from this...


To this...


It's almost done - we're still finishing up the doors and some acessories, and will do windows when it warms up. Love the new and improved closet, with significantly more storage.

And the next project is starting up soon - the 'animal and plaid room' has gone from this...


To this...


Uncluttered - which required putting some things in the yard sale pile - and ready to dig in.

Saturday, December 27, 2008

Funny we should mention boogers...

because I got my annual Winter Cold. Always when on vacation. Oh, well. At least we weren't traveling. And it's not a terrible cold, just bad enough to keep me (mostly) on the couch a couple of days. Or in front of the pellet stove - that works too.

Not bad enough to keep me from 'supervising' Ken as he installed the cedar ceiling and closet rack-kit-thingy in the guest room. I got the cedar on a research trip to Home Depot - I planned to spend a good hour contemplating new developments in the field of DIY closet organization in the aisles of HD. Sometimes you just need to stand there and look, right? Well, I found a couple of cool things.

First, the cedar lining. It's cedar panels, like wainscoting - tongue & groove and all beveled on the edges. They also had cedar OSB, which was kind of cool - maybe for a modern house. At about $20, I figured I'd pick up a box of the panels and we could throw it on the guest room closet ceiling - which had lacquered plywood (eew) on it, in somebody's halfhearted attempt to camoflage some probably falling-down plaster. We didn't dig into the whole plaster operation either, but figured the cedar would be a bit posh, and certainly preferable to sanding and painting the plywood. Smells purty, too. We signed the plywood for posterity (in case anyone gives a damn when the closet was re-done).


These wacky upside down photos are just about how my stuffy old head has been feeling. Sorry if I give you vertigo. The 'after' photo is not quite done - it was taken just before the last piece went in, and before moulding.

On my closet research trip, I also grabbed a big old wire shelving kit and Ken was very zen-like installing it - especially since we were both in the closet at some points in the operation, and it's not very big. 60 seconds in heaven, right? Photos of that later.

We also finished some touch-up work and have almost wrapped up the guest room. Tomorrow I think I'll be feeling better and we'll see if we can get most of the rest of the small jobs done. I hope I'm feeling better - I've been basically a human water balloon since X-Mas, consuming tea by the gallons.

Monday, December 22, 2008

Color!

The guest room ceiling is painted, and the walls have a coat of paint on them!

The color is peristyle brass (one of those Sherwin Williams Arts & Crafts colors). We wanted a piney-green, not a sagey or bluey green - because we want this room to feel like a nest in the big ancient spruce that the windows look into. You know that color that you realize, toward the end of winter, that all the evergreens have turned? Chlorotic cedar, or something like that? That's this color.

It wasn't a color I'd pick off a sheet of greens right off, and in fact, it's more yellow-gold than green, but the more we looked at the paint chip, the more it grew on us.

Then we opened the paint can and it looked like a whole lotta yellow. Hmmm. But - we know from past experience not to judge before getting at least the prescribed two coats on the wall. The living room ceiling looked peach (!) - until we got the yellow on the walls, then it looked fab.

So, paint we did. This is the first coat. By the way, those teeny little foam rollers they sell for trim or edging happen to be perfect to reach down behind radiators, solving that long-standing dilemma.

The color tones down and mellows out (and gets greener) as it dries. I also think it will get greener when we paint the trim (SW White Hyacinth), because that will really be creamy and be a counterpoint to the gold color. We like it a lot so far, especially for a first coat. It's a really, really nice deep color that's not dark. Perfect for a bedroom.


Then again, it's kind of the color of boogers. Eew.

Sunday, December 21, 2008

Houseblog haiku

Henry was all curled up in his bed, staring zen-like out the window at the snow, and he made us think of haiku. Then we ended up thinking of haiku as we (finally!) painted - or technically, primed the guest room.

Painting while snowing;
primer is white, snow is white.
They cover the old.


Ken was meditating on a potential paint color disaster:

Awesome* girlfriend cries,
"WTF is going on?"
Room is wrong color.

* Note: originally was "nagging", he changed to "awesome".

On the painting process:

The rasping brush leads,
squishy roller following.
Primer covers all.

Previous color scheme:

Green paint, pepto paint,
Pink and blue trim, many coats,
What were they thinking?

On tomorrow's agenda:

Big snow day arrives.
We can finish the ceiling.
Then time for color.

Saturday, December 20, 2008

You can be Santa...

We had decided to go shopping for some dog & cat beds and toys, and drop them off at the local animal shelter. We usually donate in some way to the shelter whenever we can, and this year it seemed especially poignant since Eddy has had a rough time. Both of our cats came from this shelter and Eddy was a rescue too, and if we could save all the dogs & cats, we would. And bunnies too - they had bunnies there. My favorite bunny had one ear up and one flopped over - very cute.

We dropped off our load of items, and took a walk around to see all the animals. A little boy was there with his family, picking out a dog, so at least one guy was heading home soon. We think there was at least a toy or bed for all the other guys, but it was still tough to see them there. The staff was very thankful about the donation, and I'm sure the dogs & cats were even more so.

A sign on the door reminded us that it doesn't have to be fancy - animal shelters, as this one did, often "desperately need towels and pillowcases". We've also brought over old blankets, big pieces of fleece from never-finished projects, old pillows, etc.

So, as you finish your bathroom remodel & dress it up with a new set of towels, open a nice package of new sheets for the holidays, or upgrade to a great period-style quilt, consider bringing the old ones to your local shelter. Because everybody deserves a warm bed.


Well, these two guys are kind of ridiculous in their little taquito.

Wednesday, December 17, 2008

No more pencils, no more books!

Get ready house - after today, Ken & I will both be on a nice, long break - the first time we've both not had to teach, be in the field, or travel over the holidays in - well, forever!

I cannot wait to break free and tackle those upstairs bedrooms...plus, sleep late, read magazines - this sounds soooo decadent. I still can't even fathom what real time off is going to feel like.

http://www.youtube.com/watch?v=AeZxRYXZ154&feature=related

Tuesday, December 16, 2008

Kitchen heard round the world

Thanks for the shout-out, bungalowscious (damn, that's hard to spell! Did I get it right?). Your kitchen is unbelievable, and totally making waves! Thanks for including Maine products with your lovely New England Art Tiles - I confess, that tile was one of our top choices too. It's just awesome.

Your before and after photos are such an insiration to all of us living in horrible, tacky, plastic neglected homes; homes like ours where the realtor said with a funny look on her face, "Well, I guess you could call this move in condition". What an amazing difference - gorgeous design choices, and it looks like you didn't alter the original footprint. Nice vision!

Wow, wow, wow. Star of the day!

Sunday, December 14, 2008

We can do it!

You know Rosie.
Not this one. What the heck is she doing with a new show anyways. Eek.

So, did you happen to catch "It's a Wonderful Life" last night? We did. I mean, how can you possibly flip past any movie with Jimmy Stewart? Especially this one. Even though "Mr. Smith Goes to Washington" is the best ever.

Anyways, on the 1946 classic last night, I noticed that Mary was totally an early home makeover diva! In the part when they gloss over the period of time between them getting married and the day he meets Clarence, the narrator notes that Mary did everything she could to make the drafty old house a home - and sure as shit, there she is up on a ladder in a dress and big gloves, squeegie-ing wallpaper.

Rosie was the it girl around the early 1940s, paving the way for Mary's character to be a total badass and all around hostess, mom, and generally fab woman. Damn girl, you can do it! Mary totally rocks, for restoring an old home AND looking good doing it in a dress. She should see some of the get-ups I wear.

Note to self: be more elegant while restoring house.

Friday, December 12, 2008

Not naughty knotty pine...

...but not clear fir either.

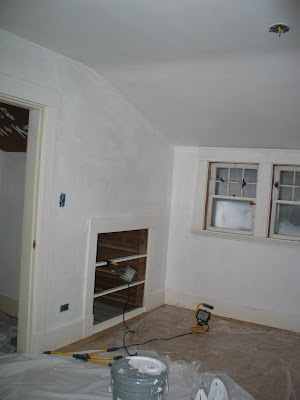
That's what I think of the drawer fronts from the built in under the eaves in the guest room.

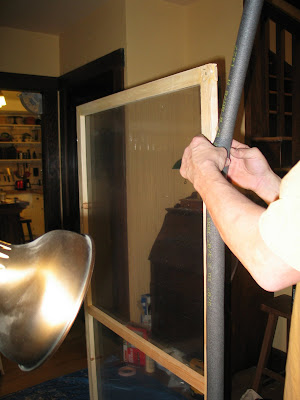
We had decided to paint the trim in the three upstairs bedrooms. However, because (1) the sashes were so caked with paint, (2) half the doors (like, the hallway side of each door - not one half of the total number of doors) are unpainted, and (3) we really like the way the stained sashes/doors and painted trim in the kitchen look, we decided to do the same type of thing in the guest room and bedroom. So the plan was to strip the other two halves of the doors, strip the four window sashes, and strip the built-in drawer fronts. After all the other paint stripping we've done - easy, right?

Not so much. Ken carried the drawers down to the cellar workspace. When I went to assess the situation and plot my approach, I saw - gasp - are those knots on the inside of the drawer fronts? Knots - like cheap wood? Like no other piece of wood we've seen yet in the entire house? What the ???!!???

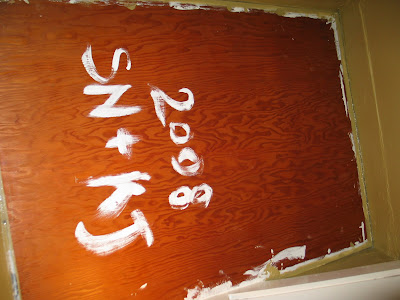
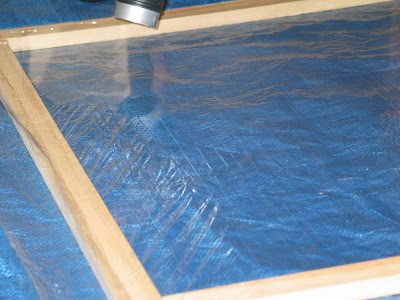
So, I started stripping (the paint!) using Peel-Away - I had it in my head that I wanted to do a bit of an archaeological dig to reconstruct the paint history of the room. As I peeled away layer after layer, I found (newest to oldest): 2 layers of white, a layer of blue (it's a boy!), a layer of pink (it's a girl!), then two different off-white layers. Incidentally, the oldest layer looks a hell of a lot like the color we'll be re-painting the trim. Welcome back, 1923 color!
Then - the moment of truth - down to wood. And knots. They were there - not just cleverly hidden, only showing on the back of the one inch thick, 12 inch wide (!) board, but right through to the front.

The good news: paint strips off damn easy from a knot! And, you can now see the nice, crisp beveled edge that the makers had carved into the drawer fronts. Great detail, lost under all that paint.

The bad news: time to rethink? Should we still go with dark stained drawer fronts, knots and all, or should we paint them too? The doors and sashes will still be dark wood no matter what - so I'm partial to sticking with the plan & going au naturel with the drawers. What do you think...?

Wednesday, December 10, 2008

Iron pig

Hey Schmich-Schackers! Our guest room is almost done - finally - too! After a couple of small jobs this week, we officially finished the prep stage. Ken did the final sand on the ceiling. Ken is the bomb: he not only follows my rule that I'm to be called the Stove Princess and that I have dibs on the chair in front of the pellet stove, but also is cool with the fact that I totally refuse to do any ceiling work because it sucks! I fixed/filled/final sanded any repairs to the trim, scrubbed all the dust and goo out of everything (yick!) and we both went over the walls with an eye for missed cracks and problems.

This is good news, dear family & friends, because your holiday presents are somewhere in this giant pile:


Which is where we stored everything we unceremoniously yanked out of the guest room. Those built in drawers were our gift wrap - present - holiday miscellaneous storage, so sort of a dumb time to shove it all in the tiniest room in the house.

So last night Ken painted the radiator. You don't want to see the job I do with a can of spray paint - it's not one of my special talents. So he does that too. We found out that Rustoleum Antique White is pretty damn close to Sherwin Williams White Hyacinth, the trim color. Like scary close. Especially because it's glossy. Anyone without the world's best eye for color won't notice the difference.
Also note: the giant novelty plastic bags that came on the pallets of pellets make lovely dropcloths!

Oh, and we should mention something about painting radiators. According to The Bible (Renovating Old Houses by Nash), it's totally kosher. See below (I'm too lazy to re-type):


This weekend: paint goes on the walls and maybe trim too! Then we can dig out the gifts.

Sunday, December 7, 2008

Storm windows: how we built them

Ken's storm windows:

1. Materials Needed:

  • Standard 1/2" pipe insulation (cost ~$1 for 6'); 2 pieces the length of the window and 2 pieces the width of the window
  • 1"x2" lumber (we found some cull that was very cheap!); 2 pieces the length of the window and 2 pieces the width of the window
  • 1"x1" lumber for cross bar (does not need to be 1x1; any scrap 1xsomething will work. You'll need a piece a bit smaller than the window's width)
  • Wood glue
  • Four 5/8" (no. 6) wood screws
  • Heavy duty staple gun or brad nailer & staples or nails (>1/2")
  • Heat-shrink window film (twice as large as the window you're covering, for both sides of storm)
  • Double-sided tape that comes with window film
  • Small strap (scrap of ribbon or thin nylon webbing)
  • Trusty hammer & screwdriver
  • Scissors
  • Hair dryer

2. Build the frame

  • Cut 1"x2" to length (length or width of window opening minus 3/4" for foam. We recommend you test out the measurements on your window/with your foam before cutting all your lumber). We wanted the storms to push in between the stops, so they'd keep out cold air from the sash pockets, so we measured between the stops.
  • Make lap joints (cut half way through end of boards the same distance from the end as the width of the board creating a large rabbet). We used a table saw, with the blade set to half the height of a board (3/8"). Clamp on a fence the width of a board, then run the board across the blade several times to remove the material. Repeat with all 4 boards for each window.
  • Glue the joints, making sure to cover all sides that touch.
  • Hold the joints at right angles, with a square, and staple, or brad nail, the joints.
  • Complete the four-sided frame and put one screw in each joint - the staples or nails are just pinning the thing together and it needs a screw to be structurally stable. You could also just use a few screws; we thought the stapling worked great & was quick.
  • Note: we did not stain or paint the wood. Very little of the wood shows when installed, they're only in for the winter, and we weren't sure how well the tape would stick to a finished surface.

3. Add the cross-bar

  • Dry fit the 1"x1" cross bar in the frame at the same height as the sash interface and mark. This cross-bar should be the length of the window's width, minus 2 widths of your 1x2 stock. We found that without the cross-bar, the storm windows bowed in a bit when installed.
  • Pilot drill for a single finish nail (6d, 2"), glue the ends of the cross bar and nail together.


Doing several windows at once really saves time. Especially if you have the jig all set up for the table saw.

4. Tape the perimeter

  • Add tape to wood frame, near the middle of the board.
  • Press down hard.
  • Peel the backer to expose the adhesive.


5. Lay plastic

  • Find a friend to help.
  • Lay plastic over taped side. Do not pull too tight but cover the whole frame so it's fairly taut.
  • Press plastic film into adhesive tape with finger.
  • Trim off excess plastic. Note: a utility knife sucks for this - for some reason, the plastic is really linear and won't cut right. Instead, run sharp scissors along the edge of the frame. Much better.

6. Shrink plastic

  • Heat plastic film with dryer untill all wrinkles are gone.
  • Press film into adhesive tape while heating the film.

Flip the frame over; repeat steps 5 and 6 for the other side of the frame, creating a sealed pocket of air.


7. Add pull-tabs

  • Staple a scrap of folded ribbon to the back and up over the top - so when pulled the ribbon is attached to the back of the joint. This is so you have a way to get the windows out in the spring! They install tightly.
  • We put two tabs on the top of each window. If you're picky (like Sarah), make sure the scrap ribbons coordinate with the paint color of the room.
  • At this point, you could label the window with its room and placement so you'll remember next year! We are labeling them along the top, near one of the ribbon tabs.


8. Add foam gasket

  • Carefully split open the seam in foam insulation.
  • Cut foam to length with 45 degree angle.
  • Stretch foam over edge of frame and match corners of foam edges. Trim if necessary.


9. Install! (a.k.a., smush into window opening)

  • Press into window opening, one side at a time.
  • May require some force, keep foam aligned.

We ended up with at least half of our lumber from the cull pile, some scraps we already had in the shop, and most of the plastic purchased new ($11 for a box with 9 big sheets). Ribbons were free from the scrap drawer. Foam was $0.98/piece for a 6 ft section (there were 3' sections in a 4-pack bag that were a bit cheaper for some of the small ends). Overall, we estimate that this project cost about $7 average per window, and we're doing 31 windows (over half are done, rest are started!) The dark foam makes them fade into the window and they're not real noticeable. They seem to work great so far.

Thursday, December 4, 2008

Hi gorgeous!

Now this is eye candy. We found this little gem on ebay, after realizing we needed some sort of hod/scuttle/bucket to pour pellets in the stove (after making several giant messes with them). The seller was willing to negotiate on shipping, and next thing you know, we got this lovely arts & crafts style, hand-hammered, heavy coal scuttle. Nothing like an early X-mas present to yourself, eh? It cost less than a boring, machine made, modern ugly coal hod. So far, not much mess. And it looks so damn good, who cares how it works? (Frank Lloyd Wright, I hope you didn't hear that).

Wednesday, December 3, 2008

Eye spinach

Just some quick eye-candy. Or maybe it's more like eye-spinach: maybe not your favorite, but it's good for you. I think the guest room actually looks worse in the after photos at this point, but a LOT of progress was made when we had a couple of days off last week. We finished with the wallpaper stripping, fixed & filled all the bad plaster, tore apart things that need to be stripped, and even wet sanded all the trim. Ken's in the midst of the ceiling repairs. We're almost, almost ready to paint. It'll be Sherwin Williams "Peristyle Brass" on the walls, and "White Hyacinth" for the trim. Surprised? Yes, we are painting some trim and it will be a version of white. Yes, it's true: we're not de-whiting something in the house. De-pinking will be good enough on this one. Then it will be candy, not spinach.


It feels good to get all that gunk out of there, though. One thing we were sorry to see go: this old height chart dated from the early 70s, on the inside of the closet door frame. I think it belonged to the daughter - so sorry Rose, wherever you are. We have lots of pictures of it for posterity. Also, you can be pretty happy you're quite a bit taller than shrimpy old me! So gloat away...


Monday, December 1, 2008

The reviews are in: two (furry) thumbs up!

Henry is apparently the smartest of our pets since he was the only one to be afraid of the pellet stove (that old fire=bad instinct). He wouldn't go near the thing for about a week, and was pretty much horrified the first several times he saw it burning. Add that to the fact that the radiators - his favorite perch - don't get hot nearly as often, and we thought we'd have an evil kitty plotting our destruction on our hands.

Well, he's changed his mind now that - last night - he finally seemed to have decided that, "damn, that hot air feels good! And the fire seems to be contained in that box." So he decided to station himself on the rocker we had pulled out for Ken. Eventually Ken ended up in my rocker, and I was on the couch (but I got the blanket!). Only a cat would be able to force two people to take turns in a rocking chair so the cat could have the other one all to himself. How do they do that mind control thing?

Can you see him smile as he basks in the glow? What a life this guy leads.